How to create a virtual hard disk on Windows 10

Virtual machines are widely used not only in corporate environments, but also for their purposes. Environment virtualization allows you to run multiple isolated operating systems of different types on the same hardware platform. This reduces the costs associated with purchasing and maintaining additional equipment. Each OS can run and use its set of applications that do not interfere with each other, so the “neighbors” will remain intact if a failure. However, this technology is also exposed to threats, including the loss or problems with access to critical virtual data.
What is a virtual machine?
A virtual machine is a platform that simulates the operation of a physical machine. The virtual machine is located on a real physical host. Using the resources of the physical host, the VM remains completely independent, since it uses its own software components (motherboard, video adapter, network interface, memory, etc.).
The operating system of the virtual machine is called the guest OS, and the operating system in which the virtual machine is installed is called the host OS. Each guest OS runs on the host OS just like a regular program.
The virtual hardware on which the guest OS is running is managed by a hypervisor, which allocates physical resources to each of the systems without interrupting each other.
The most common hypervisors (there are both free and licensed versions) on the market today include:
Microsoft Hyper-V is an advanced software virtualization option that ships with Windows Server 2008, Windows 8 and is used mainly in a server environment, often to create private clouds.
VMware Workstation for Microsoft Windows and Linux, VMware Fusion for macOS, VMware ESXi enterprise hypervisor.
There are some good virtual solutions out there today:
Oracle VM VirtualBox is an open-source virtualization software. It supports a wide range of guest operating systems (Windows, Linux, BSD), and also provides the ability to create multiple virtual machines for simultaneous use.
Xen is an open-source Citrix virtualization software for large ISPs or server hosting.
Parallels Desktop is a premium virtualization solution designed specifically for Apple Macintosh computers.
QEMU is a free open-source virtualization platform for Linux, macOS, and Windows users using custom builds.
Virtual disks
Virtual disks are special files that store the operating system and applications and are presented to the guest OS like a normal physical hard disk. Such a file can be stored on a remote computer, on a host machine, or be part of a virtual machine, or mounted in the OS of a physical computer. A virtual disk usually differs in file extension:
- VMDK format designed for VMware virtualization;
- VHDX format typical for Hyper-V;
- VDI native VirtualBox virtual disk format;
- VHD format designed for Microsoft and Xen virtualization;
- HDD is a format used primarily by Parallels.
Create a Virtual Machine using PowerShell
To start, type "PowerShell" in the search bar, right-click on the PowerShell result, and select "Run as administrator".
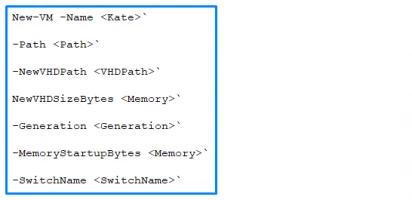
Next, start typing commands in PowerShell:
New-VM -Name
NewVHDPath
NewVHDSizeBytes
Generation
MemoryStartupBytes
Switch
After entering the last command, check Hyper-V Manager. You should see the newly created virtual machine turned off and then you can continue with the setup process.
Create VHDX (Virtual Machine) File using Hyper-V Manager
First, in the search box, enter "Hyper-V Manager" and open Hyper-V Manager, then select the "Actions" section and click "Create a virtual machine".
If this is your first time doing this, you can open the “Before You Begin” section for basic guidelines for use.
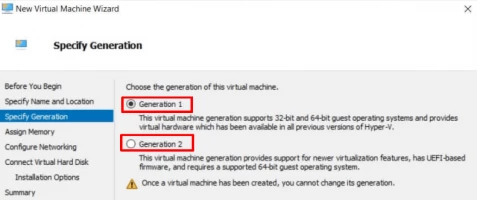
Then you need to enter the name, then the location of the virtual machine, and in the "Generation" section you can select the generation of the virtual machine.
Next, you determine the amount of memory to be assigned to the virtual machine and select a virtual network to connect to the virtual machine.
This is followed by setting up the virtual hard disk; you can also use an existing VHD or skip this step and connect the VHD later.
In the Summary section, you will see a short description of your new virtual machine, and then, you can click Finish.
Create New VHD or VHDX File with DiskPart
- 1. Press Win + R shortcut keys on the keyboard to open the Run dialog.
- 2. Type diskpart into the Run box and hit the Enter key. Confirm the UAC prompt.
- 3. Type the following command: create vdisk file="Full\path\to\vhd\file" maximum=size type=fixed. This will create a new fixed size VHD.
- 4. To create a dynamically expanding VHD/VHDX file, execute the command: create vdisk file="Full\path\to\vhd\file" maximum=size type=expandable.
- 5. Substitute Full\path\to\vhd\file with the actual full path of the .vhd or .vhdx file for where you want to store it at.
- 6. Substitute size with the maximum size you want for the .vhd or .vhdx file in megabytes. E.g. 1024 for 1GB.
How to set and mount up a VHDX or VHD on Windows 10
1. Open the new blank .vhd or .vhdx file created using Option One (Disk Management), Option Two (Hyper-V Manager), Option Three (PowerShell), or Option Four (command prompt).
2. Click/tap on OK in the Couldn't Mount File error message.
3. Open Disk Management (diskmgmt.msc).
4. Right click on the unknown disk (ex: "Disk 3") for the unallocated virtual hard disk, and click/tap on Initialize Disk.
5. In the Initialize Disk dialog, select (dot) MBR or GPT for the partition style you want for virtual hard disk, and click/tap on OK.
6. In the Disk Management, right click or press and hold on the unallocated disk for the virtual hard disk, and click/tap on New Simple Volume.
7. In the New Simple Volume Wizard dialog, click/tap on Next.
8. Make sure the Simple volume size is the same size as Maximum disk space (ex: 1021), and click/tap on Next.
9. Select (dot) Assign the following drive letter, select a drive letter (ex: "F") you want in the drop menu for the virtual hard disk, and click/tap on Next.
10. Select (dot) Format this volume with the following settings, select the file system (ex: NTFS) you want for the virtual hard disk, type a volume label (ex: "Example VHD") you want for the mounted virtual hard disk name, and click/tap on Next.
11. Click/tap on Finish.
You can now mount and unmount this .vhd or .vhdx file on any Windows 10 PC you like.
Possible difficulties and ways to overcome them
Along with the many advantages of virtualizing the environment (lower hardware costs, software isolation, mobility and more efficient IT operations, etc.), there are certain disadvantages:
For example, the virtual machine is not as efficient as a real machine because the virtual machine does not have direct access to the hardware, and the need to allocate physical resources creates additional overhead. This is especially evident when several virtual machines are running.
Also,if a physical host crashes, it will affect all the virtual machines that reside on it. Thus, all virtual machines will become inaccessible.
Problems with data sharing
The exchange of information between the host OS and the guest OS is as follows: both OS are started and virtual network transport is used. Usually, there is a transport wrapper for the guest OS that allows you to exchange files using a simple drag and drop procedure. This process can take a long time, and in some situations it may be simply impossible, for example:
- The guest OS is not equipped with special network protocols.
- File size limitation.
How to recover information with VMFS Recovery
DiskInternals VMFS Recovery has been in use for many years and automatically checks the current state of volumes, VMware VMFS datastores and disks, and reads images on ESXi / ESX servers, VMware vSphere and VMFS fabrics where possible. Lost information is recovered online without shutting down the system, which is very useful and convenient. In addition, you will receive a Preview of the found data, which is necessary for testing the program and checking the integrity of the data. If you are satisfied with the result, purchase a license and then simply export the data to the desired storage location. The recovery wizard will guide you through all the steps of the process, so there is no cause for concern if you are an inexperienced user!

